Top: self-made pants: 7s watch: present from Erin (love her) shoes: vintage/thrifted bracelet: milk&honey
I love these boxy shirts because they can be great for layering, comfy, cute, and can be dressed up or down. I had a hard time figuring out what to wear this with, I first had a jean top under it paired with a high waisted wide leg paints with some nude high heels peeping through. I just played it safe this time so you could get the jest of the shirt. Next time I would make the neckline a boat neck, I would have liked it a tad more.
A couple awesome thrift finds in this post...the riding boots and the knit heart fabric. Score! I died when I found both, I guess that's a bit dramatic, but really. And this milk&honey bracelet! Don't get me started...darling. I just wish I had the matching necklace.
Supplies:
1 yard of fabric - stiff knit or soft cotton or a sweater
boxy or loose shirt
7 buttons
sewing machine
thread
scissors
Instructions:
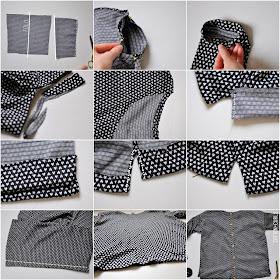
1. Lay a boxy top you have down on top of some knit fabric, and cut out the shape. If you don't have a boxy top, adding a good 5"-7" of to waist would be good or at least a few inches wider than your chest (if you are a bit chesty).
Cut out the sleeves by measuring around your bicep area - so a few inches lower than were your shoulder seam would land plus an inch for seam allowance. Then make it the length you like plus and inch for seam allowance.
2. Sew up the side seams of the top by pinning them right sides together, Leave 4 inches of the top un-sewn at the sides and leave openings for the seams (half the width of your sleeve). Then sew up the shoulders leaving and opening for the neckline.
3. Fold the sleeves in half, right sides together and sew up the side to make a tube. Try it on and make adjustments if needed. I tapered mine just a little so it was more fitted near the bottom of the sleeve.
4. Pin the sleeve opening to the shirt opening, pinning right sides together. Sew together.
5. Hem the sleeve bottom at least 3/4"-1".
6. Align the side seams together and cut out a neckline. I decided to go deeper than this. Remember you will be hemming 1/2"-3/4".
7. Hem neckline 1/2"-3/4".
8. Fold the front flap at the bottom in half (2") so right sides are touching. Then sew up the side.
9. Turn that piece right side out.
**Repeat with the other side, but the back flap will be hemmed only an inch vs. 2 inches so the back will be longer.
10. Roll the edges in (take the selvege from the left over seam allowance and fold that) and sew down crossing over the side seam of the shirt to secure it.
11. This is what it looks like.
OPTIONAL:
12. Line the side seams up and pin the center back. Sew it in an inch.
13. Iron it open centered over the middle seam.
14. Add buttons!


Love it!! you're so talented! cant wait to try this out, the buttons are so cute!
ReplyDeleteCute! Love the wider neck.
ReplyDeleteI recently started adding snaps to everything; similar look to the buttons you added but they work! Cute top, and GREAT find with the fabric!
ReplyDeleteI love back buttons! and this is one great top, very versatile, too!
ReplyDeleteSo cute!! I love the neckline on it and the buttons down the back
ReplyDeletewww.studentswife.com
I love this top - it's one of those that you can wear with skinny jeans and a pencil skirt and always look cute. I've got to try this!
ReplyDeleteVery cute...I love the button detail!
ReplyDeleteLove the bottons down the back! they are awesome! :)
ReplyDeletexx Elle
http://www.talonsetbonbons.com/
Love it, will definitely be making that soon! :)
ReplyDeletexx
Sofia
www.lescoupsdecoeur.com
The works great in the polka dot fabric.
ReplyDeleteThis works so great in the polka dot fabric.
ReplyDeleteI just got into tops with buttons up the back over the summer. I restyled a shirt to get my look, but I like this as a way of using up some of my fabric stash.
ReplyDeletex Elena @ Randomly Happy
Very cute. Love the buttons down the back.
ReplyDeleteWhere did you find your boots? They're so cute!
ReplyDeleteWhere did you find your boots? They're so cute!
ReplyDeletethis is so awesome. I was waiting for this since so long. Ur so gud at it. n i'd feature u on my blog soon http://wardrobe-engineer.blogspot.in/
ReplyDeleteThis comment has been removed by the author.
ReplyDeleteI love your tutorials. Thanks for posting them, I definitely wouldn't know what to do as far as making my own shirt patterns without them!
ReplyDelete